In old Lucknow Masjid and Immam Bada of “Naya Mahal Kashmeri Mohalla” is not only a beautiful it is also historic, these are more than 200 years old. http://www.areptone.in/masjid-immam bada/masjid-naya-mahal.jpg at present it is situated very near to Kashmeri Mohalla Police Post. See place on Google map link is given as following https://maps.app.goo.gl/fLbfDZneYbdMDvc88
Adeeb Raza Visual Basic 6 Program Code
Wednesday, 28 July 2021
Thursday, 13 June 2019
Make a Bootable Pen Drive of Windows -7
Here we are describing how to make a Bootable Pen Drive of Windows -7
This is a very simple way to make a Bootable Pen Drive of Windows -7
without any other software. You need only a Bootable Windows-7 CD
PART (A)
RUN CMD
TYPE DISKPART
DISKPART> LIST DISK
DISKPART> SELECT DISK 1
DISKPART> CLEAN
DISKPART> CREATE PARTITION PRIMARY
DISKPART> ACTIVE
DISKPART> FORMAT FS=NTFS QUICK
DISKPART> ASSIGN
DISKPART> EXIT
PART (B)
RUN CMD
C:\Windows\System32>F: Press enter
F :\> F: is CD drive
F :\> inserts Windows-7 CD in CD drive
F:\>CD Boot Go to Boot Directory
F:\ Boot >Bootsect.exe/nt60 I: Press enter
I: = Pen Drive for Making Bootable Win7
Then Select all files & folder of windows7CD Press Ctrl+A
Then Copy all Selected Files & Folder Press Ctrl+C
Then Past all Selected Files & Folder on Pen Drive Press Ctrl+V
Now PEN DRIVE IS READY TO BOOT for Windows-7
http://www.areptone.in/download/PenDriveWin7Boot.pdf
Thanks
Adeeb Raza
Monday, 10 June 2019
RECOVER SEAGATE HDD 1-TB SHOWING SIZE ONLY 33 MB
Here we are describing step by step how to repair/recover a hard disk
drive capacity 1 TB showing size only 33 MB. Click on the following
link & watch this video
Download Repairing Software & make bootable USB
(1) Download (SeaToolsDOS223ALL.ISO)
https://www.seagate.com/staticfiles/support/seatools/SeaToolsDOS223ALL.ISO
http://www.areptone.in/DOWNLOAD/SeaToolsDOS223ALL.RAR
https://www.seagate.com/staticfiles/support/seatools/SeaToolsDOS223ALL.ISO
http://www.areptone.in/DOWNLOAD/SeaToolsDOS223ALL.RAR
(2) Download (Win32diskimager) https://excellmedia.dl.sourceforge.net/project/win32diskimager/Archive/win32diskimager-1.0.0-install.exe
Thanks
Adeeb RazaWednesday, 5 June 2019
EVM Electronic Voting Machine all secrete by Adeeb Raza
No dough that the election of India is neat & clean with EVM. This
is only an effort to resolve all the confusion created by different Party &
peoples of our country regarding EVM & voting system of India.
Any EVM can manipulate in 5 minutes by replacing the original programe
IC & put manipulated pre programe ROM which is an EEPROM Intergated Memory
Circuit (Memory IC) in the EVM.
For more details click on the following link & check your self to
satisfy your self. http://www.areptone.in/download/myevm.pdf EVM
Can manipulate in 5 minutes (a) change self prep-programmed Rom in evm (b) EC
can programmed a winning programmed of any candidate with Date & time
changing
Question No1.
What is an EVM,
Question No2?
Can Hack an EVM,
Question No3.
Can manipulate an EVM
See all the
answer of above question click on the following link.
http://www.areptone.on/download/myevm.pdf
Programme link: click on the following link & you can play with EVM
http://www.areptone.in/download/evm.rar
Thanks
Adeeb Raza
Wednesday, 25 July 2012
VB-6 Code for Input & Output function of 8 Channel GPIO USB Card
(A) Following is the circuit diagram of 8 channel GPIO USB card with Microchip PIC18F14K50 Controller.
(B) Following is the wiring diagram of 8 channel GPIO USB card with 8 On/Off Switch connected as INPUT for testing input function of GPIO USB card.
(C) Following is the wiring diagram of 8 channel GPIO USB card with 8 LED connected as OUTPUT for testing Output function of GPIO USB card.
(D) VB-6 Code for Input & Output function of 8 Channel GPIO USB Card download from follwing web Links.
INPUT CODE: - (A)
Dim line1 As String, line2 As String
Private Sub Command1_Click()
MSComm1.CommPort = 6
MSComm1.Settings = "9600,N,8,1"
MSComm1.InputLen = 0
'*****************************************
MSComm1.PortOpen = True
Text1.Text = "gpio read "
X = Text1.Text
Y = Text2.Text
Label5.Caption = (X + Y & Chr$(13))
'
MSComm1.Output = Label5.Caption
'
'Print Label1.Caption & vbCrLf 'Chr$(13)
'
Do
DoEvents
Buffer = MSComm1.Input
Loop Until InStr(Buffer, “10”)
'
'Loop Until InStr(Buffer, “”) '& Chr$(13))
'Loop Until InStr(Buffer, “” & vbCrLf)
Label1.Caption = Buffer 'This is the INPUT Value on Lavel1
P = (line1 + line2)
P = Label1.Caption
MSComm1.PortOpen = False
Q = Label1.Caption
Open "C:\AEP\AR.txt" For Output As #1 'Save Buffer in the file AR .TXT
Write #1, Q
Close #1
End Sub
Q = Label1.Caption
Open "C:\AEP\AR.txt" For Output As #1 'Save Buffer in the file AR .TXT
Write #1, Q
Close #1
End Sub
'*****************************************
Private Sub Command2_Click()
End
End Sub
End
End Sub
Private Sub Command3_Click()
Call Command1_Click
Open "C:\AEP\AR.txt" For Input As #1
Input #1, Q
Close #1
Label10.Caption = Q
End Sub
Call Command1_Click
Open "C:\AEP\AR.txt" For Input As #1
Input #1, Q
Close #1
Label10.Caption = Q
End Sub
Private Sub Command4_Click()
MsgBox ("Adeeb" & vbCrLf & "Raza") ' Checking Function of vbCrLf
End Sub
MsgBox ("Adeeb" & vbCrLf & "Raza") ' Checking Function of vbCrLf
End Sub
Private Sub Timer1_Timer()
'Call Command1_Click
End Sub
'Call Command1_Click
End Sub
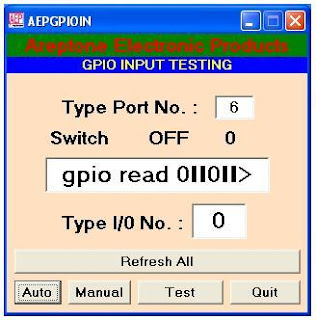
Screen Shot of INPUT TESTING OF 8 Channel GPIO USB Card
************************* TESTED FINAL ********************************
INPUT CODE: - (B)
Dim X, P
Private Sub Form_Load()
P = 1
Timer1.Enabled = False
MSComm1.CommPort = P 'Text3.Text Com Port Number
MSComm1.Settings = "9600,N,8,1" '9600 baud, no parity, 8 data, and 1 stop bit.
MSComm1.InputLen = 0 'Tell the control to read entire buffer when Input is used.
MSComm1.PortOpen = True 'Open the port.
End Sub
Private Sub Command1_Click()
Line1 = "gpio read "
Line2 = Text2.Text
Line3 = Chr$(13)
MSComm1.Output = Line1 + Line2 + Line3 'Text1.Text & Chr$(13) + A
Buffer = MSComm1.Input
'http://www.vb6.us/tutorials/vb6-string-functions
'************************************************
strSubstr = Mid$(Buffer, 14, 1) 'strSubstr = In Buffer 14 Positision one data Switch ON=1 OFF=0
Label1.Caption = strSubstr 'strSubstr = Input Switch ON=1 OFF=0
X = Buffer
Text1.Text = X
'************************************************
If Label1.Caption = "0" Then Label2.Caption = "OFF"
If Label1.Caption = "1" Then Label2.Caption = "ON"
End Sub
Private Sub Command2_Click()
Timer1.Enabled = True
End Sub
Private Sub Command3_Click()
MSComm1.PortOpen = False
End
End Sub
Private Sub Command4_Click()
Timer1.Enabled = False
End Sub
Private Sub Command5_Click()
P = Text3.Text
MSComm1.PortOpen = False
MSComm1.CommPort = P 'Text3.Text Com Port Number
MSComm1.Settings = "9600,N,8,1" '9600 baud, no parity, 8 data, and 1 stop bit.
MSComm1.InputLen = 0 'Tell the control to read entire buffer when Input is used.
MSComm1.PortOpen = True 'Open the pot.
End Sub
Private Sub Timer1_Timer()
Call Command1_Click
End Sub
Screen Shot of INPUT TESTING OF 8 Channel GPIO USB Card
Thanks
Adeeb Raza
Sunday, 17 June 2012
PC's Pareller Port Input & Out Put VB6 code
Following is the visual basic 6 program code for PC's LPT-1 Port for device controlling.
START MODULE
'//*******************************************************************************
'// LPT-Port.bas (Module)
'// (Learn how to access PC's LPT-1 Port through Visual Basic)
'// Microsoft Visual Basic Ver.6 with Windows XP as OS
'// This program required Driver file "inpout32.dll"
'//-------------------------------------------------------------------------------
'// Learn how to access PS's LPT Port through VB6 with an interface unit)
'// connected at PC's LPT-1 Port
'// Project By Mr Adeeb Raza
'// Allahabad (U.P) INDIA
'// Dated 1st March 2005
'// Email: adeebraza@hotmail.com or adeebraza@areptone.com
'//********************************************************************************
''
'' This has written in Module LPT-Port.bas
''
'' ********************************************************************************
''
'// INPUT
'//******
Public Declare Function Inp Lib "inpout32.dll" Alias "Inp32" _
(ByVal address As Integer) _
As Integer
'
'// OUTPUT
'//*******
Public Declare Sub Out Lib "inpout32.dll" Alias "Out32" _
(ByVal address As Integer, _
ByVal Value As Integer)
******************************* End Module **************************************
START
'//*******************************************************************************
'// LPT-Port.vbp (Learn how to access PC's LPT-1 Port through Visual Basic)
'// Microsoft Visual Basic Ver.6 with Windows XP as OS
'// This program required Driver file "inpout32.dll"
'//-------------------------------------------------------------------------------
'// Learn how to access PS's LPT Port through VB6 with an interface unit)
'// connected at PC's LPT-1 Port
'// Project By Mr Adeeb Raza
'// Allahabad (U.P) INDIA
'// Dated 1st March 2005
'// Email: adeebraza@hotmail.com or adeebraza@areptone.com
'//********************************************************************************
''
'' This has written in LPT-Port.VBP with Module LPT-Port.bas
''
'' ********************************************************************************
Option Explicit
Dim AEPPort As Integer
Dim AEPData As Integer
Dim pat, data, portinput, code
'
Sub AEPOut(data As Integer)
Out AEPPort, AEPData
End Sub
Private Sub Command1_Click()
pat = Text1.Text
If pat >= 1 Then GoTo X Else GoTo Y
X:
AEPPort = &H378 'Input port = Base H378 as (Data Bus)
AEPData = Val(pat)
AEPOut (data)
Label20.Caption = AEPData
Shape1.Visible = True
Shape2.Visible = False
Y:
End Sub
Private Sub Command2_Click()
pat = 0
AEPPort = &H378
AEPData = Val(pat)
AEPOut (data)
Label20.Caption = AEPData
Shape1.Visible = False
Shape2.Visible = True
End Sub
Private Sub Command3_Click()
Unload Form1
Load Form2
Form2.Show
End Sub
Private Sub Command4_Click()
pat = 0
AEPPort = &H378
AEPData = Val(pat)
AEPOut (data)
Label20.Caption = AEPData
End
End Sub
Private Sub Form_Load()
End Sub
Private Sub Timer1_Timer()
AEPPort = &H379 'Input port = Base+1 as (Status Bus)
Label21.Caption = Inp(AEPPort)
portinput = Label21.Caption
code = portinput - 7 'CODE (Input value - 7) (Status Bus)
Label26.Caption = code
End Sub
********************************** End **********************************
Screebn Shot of Above Program download http://www.areptone.com/vb6/arlptefy.zip
Thanks
Adeeb Raza
Subscribe to:
Posts (Atom)